| FitnessMuse |
|
All photos in this series taken by Pilates student Jerry Greenberg (thanks Jerry!).
Gentle Pilates Exercises
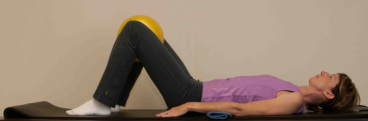
NEUTRAL SPINE: Before you get started on the following exercises, it's helpful to familiarize yourself with what is called the "neutral position" of the spine and pelvis.
Lie on your back with your knees bent, feet flat on the mat, feet and knees hip distance apart, arms relaxed by your sides. Optional: place ball or towel between knees, and a rolled up towel or pillow under the small of the back.
Imagine there is a bowl of water resting on your lower pelvis, 2 inches below your belly button.Relax your pelvis and lower back and try to find the point where you can balance the imaginary bowl of water, keeping your abdominal muscles flat with the belly button pulling gently toward your spine. You should feel a slight curve in the small of your back away from the floor. This is the natural curve of your lumbar spine.
The fronts of your hip bones and pubic bone form a triangle that should be resting approximately parallel with the floor. This is your "neutral spine" position. Inhale to prepare. Keeping the pelvis and lower back still, exhale and draw the navel in further toward the spine. If you have a ball or towel between your knees, gently squeeze the ball as you draw the navel in. Inhale to release, exhale to repeat. Repeat several times.
TOE TAPS: Bring legs to tabletop, one leg at a time. 1. Maintaining neutral spine and a 90 degree angle at knee, alternate tapping the right toes to the mat, then left toes. 8 reps per leg. 2. To modify, allow the knee to bend as you tap toes down, rather than maintaining 90 degree angle. 3. More Advanced: tap both feet towards the mat at the same time, maintaining neutral spine.
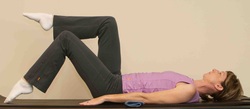 1. Try to maintain neutral spine and a 90 degree angle at the knee as you tap the toes down. |
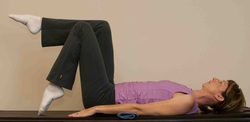 2. To modify: allow knee to bend as you tap toes down, rather than maintaining 90 degree angle. |
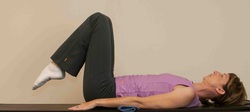
3. More advanced: tap both feet towards the mat at the same time, maintaining neutral spine. Super advanced: keep knees at 90 degree angle as feet tap down.
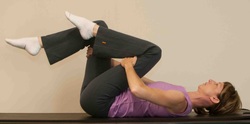
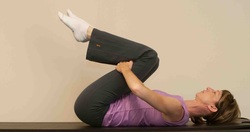
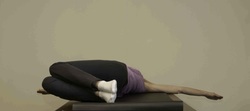
LOWER BACK STRETCH: Bring legs to tabletop, one leg at a time. 1. Support your legs with your hands behind your thighs. Inhale to prepare. 2. Exhale, sink the navel in toward your spine and slowly draw one thigh closer to your chest. Inhale, release the leg slightly. Exhale, slowly draw the other thigh closer to your chest. Inhale, release slightly. 3. Exhale, draw both thighs closer to chest. Inhale, release slightly. Exhale, repeat sequence 2-3 times.
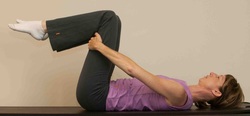 1. Support your legs with your hands behind your thighs. |
 2. Slowly draw one thigh closer to your chest. |
3. Draw both thighs closer to chest.
KNEE ROLLS: Start in neutral position. 1. Bring feet and knees together, extend arms out to "T" on mat. 2. Inhale, allow knees to relax to the right (keeping knees together, allowing outside foot to lift from mat), exhale, draw navel towards spine, bring spine, hips, and feet slowly back to center. Inhale, repeat to the left. Keep movement slow and gentle. Repeat 4-8 times.
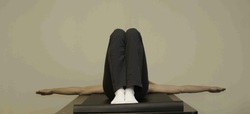 1. Start with feet and knees together, arms out to "T". |
 2. Allow knees to relax to one side slowly. |
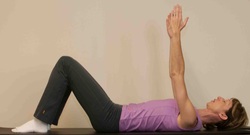
SHOULDER MELTS: 1. Start with arms reaching to ceiling, palms facing one another, shoulder blades relaxed on mat. 2. Inhale, reach fingertips to ceiling, allow shoulder blades to lift and widen, keep back of neck relaxed. Exhale, "melt" shoulder blades down into the mat. Repeat 3 times.
 1. Starting position. |
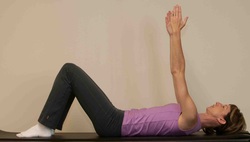 2. Inhale, reach fingertips to ceiling, allow shoulder blades to life and widen. |
ARM REACHES: 1. Start with arms reaching to ceiling, palms facing one another, shoulder blades relaxed on mat. Inhale to prepare. 2. Exhale, reach right arm back by your ear as the left arm comes down by your side. Inhale, bring both arms to starting position. Exhale, reach left arm back by ear as right arm comes down by your side. Keep arms straight and spine and pelvis neutral, try not to let your rib cage "pop open" -- only reach as far back with the arms as you comfortable can without disturbing the spine.
 1. Starting position. |
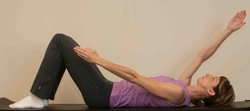 2. Reach one arm back by your ear as the other arm comes down by your side. 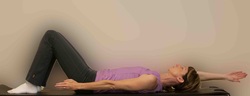 |
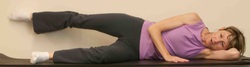
STARTING POSITION for the following side series exercises: On one side, hips stacked on top of one another, shoulders stacked on top of one another, head resting on arm, pillow, or towel. Beginners: keep bottom leg bent at 90 degree angle with torso, as shown in photos. Advanced: Keep both legs straight, extended in line with hips. Be sure to turn over and repeat the series on the other side!
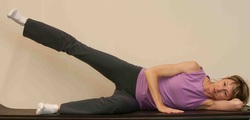
SINGLE LEG LIFT: Breathing comfortably, keeping the navel drawn in towards the spine and keeping the spine in neutral, lift top leg up about 6-8 inches, lower just to hip height. As leg lifts, lengthen through foot and engage fronts of thighs. Repeat 8 times total.
 |
 |
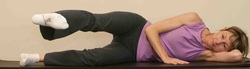
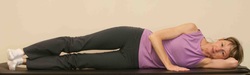
SIDE KICK: Breathing comfortably, keeping the navel drawn in towards the spine and keeping the spine in neutral, swing top leg forward with a flexed foot, pulse, and swing the leg back with a pointed foot, and pulse (tip: engage the gluteal muscles). Repeat 8 times total. Move the leg on the same plane throughout the movement, as if sliding the leg forward and back along a low tabletop. Keep the hips stacked and the spine in neutral -- do not allow the hips to collapse forward when the leg comes forward or the spine to extend as the leg kicks back.
 |
 |
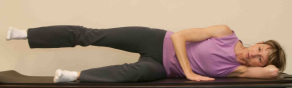
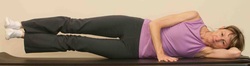
DOUBLE LEG LIFT: Extend both legs along mat, allowing legs to come very slightly forward of hip alignment. Allow top hip to drop very slightly back. Inhale to prepare, exhale, draw navel towards spine, engage fronts of thighs, extend legs long away from you as you lift both legs slightly from the mat. Inhale to lower, exhale to repeat. 8 times total.
 |
 |
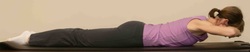
STARTING POSITION for the following exercises: On belly, legs extended, head relaxed on backs of hands. For some people, placing a pillow or towel under the hips is more comfortable for the lower back.
ARROW: Rest forehead on edge of pillow or towel, arms down by your sides, palms facing down. Inhale to prepare. Exhale, draw shoulder blades together and down, lift backs of arms towards the ceiling. Hold for 1 breath cycle. Relax arms. Repeat 3 times. More advanced: Lift head from pillow or towel, keeping the back of the neck long, and lift upper back toward ceiling.
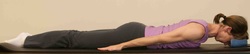 Starting position. |
 Raise arms, drawing shoulder blades gently together and down towards back pockets. |
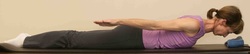
More advanced: Lift head from pillow or towel, keeping back of neck long, lift upper back slightly toward ceiling.
MULTIFIDUS CUE: Breathe comfortably throughout the exercise. Prepare by tucking in tailbone, lengthening the lower spine, tighten buttocks, draw navel in, draw the shoulder blades down towards your back pockets. Lift forehead slightly off of hands, keeping the back of the neck long. Continue breathing as you bring your hands to your forehead, lifting the forearms and elbows away from the mat. Hold. Lower arms and head to the mat. Repeat 3 times.
 1. Starting position. |
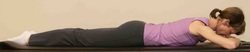 2. Lift forehead slightly off of hands. |
3. Bring hands to forehead, lifting the forearms and elbows away from the mat.